
 Do you have knowledge and experience that you can teach and monetize?
Then what you need is an online course platform where you can package your knowledge and sell.
The online learning industry is expected to grow to $325 billion by 2025. With the recent social distancing, more people are turning online to learn a new skill.
Why not ride that wave and earn some profit while helping those who want to learn what you already know?
You could present your lessons in the form of text, audio, or video. Then use an online course platform to organize your lessons and handle sales.
The good news is there is a lot of handy software that’ll make it easy for you to sell your courses online.
I’ve spent a lot of time trying out popular online course platforms to find the one that works best for my course and learned what they excel at and what they have limitations with.
In this guide, you’ll read about the best online course platforms that serve your needs.
[lwptoc toggle=”1″ hideItems=”1″ float=”none”]
What are Online Course Platforms?
Online course platforms, also known as LMS (learning management systems) is a solution that helps organize your digital assets (text, image, audio, video, etc.) and provide a way for students to access them.
Most online course platforms also offer student registration and payment processing, along with many other features that will help you with developing and managing your course.
What are the Best Online Course Platforms?
The best online course platforms provide instructors with tools that enable them to provide the optimal learning experience for the students.
How do you envision your course experience? Do you want an easy way to upload your lesson videos and sell them online? Do you want to engage with your students and make sure they are learning every step of the way? Will you be using email or webinars to market your course?
Having an idea of how you want to develop your course, and knowing what features are available among popular online course platforms will help you plan the specifics. Keep on reading this guide and save yourself some time before signing up with every course platform.
If you want to get started right away, my top recommendation is Thinkific.Thinkific is the easiest way to build an online course and start selling right away. Get started on Thinkific for free.
Types of Online Course Platforms
Not all online course platforms are created equal. There are three different types of online course platforms you’d want to consider.
All-in-one Course Platforms
As the name suggests, this type of platform allows you to conveniently run your course website with all the features you need.
Most all-in-one course platforms are built so that you can easily upload and organize your lessons without having to be too technical. Just make sure to go through the settings of each feature to provide your students with the learning experience you want them to have.
All-in-one course platforms are recommended if you are just starting, or if you want to make the course creation and management as hassle-free as possible. Thinkific and Teachable are some popular solutions in this category.

Online Course Marketplaces
Rather than having your independent course website, your course will be listed as part of a larger catalog the marketplace offers.
The benefit of using a marketplace website is that visitors browsing the site are already looking for a course to buy. The visitors buying one course may also buy a related course that’s yours. It’s like an online bookstore.
Each marketplace has a different way to calculate earnings for the instructors and different options to “boost” your course for more visibility. Usually, you won’t have direct access to your student email addresses. Udemy and Skillshare fall into this category.
Do-It-Yourself Course Creation
If you use WordPress, you can use plugins and themes to build your course website from scratch.
Building a course website on WordPress is great if you enjoy customization, flexibility, and total control.
Building your online course on WordPress means it might cost you time and money upfront during development, but it will save you money in the long run. The downside is you have to maintain it. If there’s a payment failure or if the password reset link stops working, you’ll be the one to fix it.
The DIY method using WordPress is recommended for someone who already enjoys WordPress development.
Best Online Course Platform For You
Having a clear idea of what kind of experience you want your students to have will make it much easier for you to choose the right online course platform.
A typical online course platform has combinations of these features:
- Student enrollment notification via email
- Manual student imports from excel
- Video hosting
- Payment processing, shopping cart
- Sales page
- Member community area
- Blog
- Graded quiz
- Mark lessons “complete”
- Autoplay videos
- Student progress report
- Course completion certificate
- “Drip” content (lessons become available after certain days have passed after the enrollment)
- Integration with third-party tools, such as email marketing software
- Multiple instructor profiles
- Multi-level administrators
- Ability to “preview” lessons for free
- Number of courses you can create
- Number of enrolled students
- Course design templates
- Customization with HTML/CSS
- Branded or non-branded/white-labeled (can use your company logo)
- Payout frequency and threshold
- Transaction fee
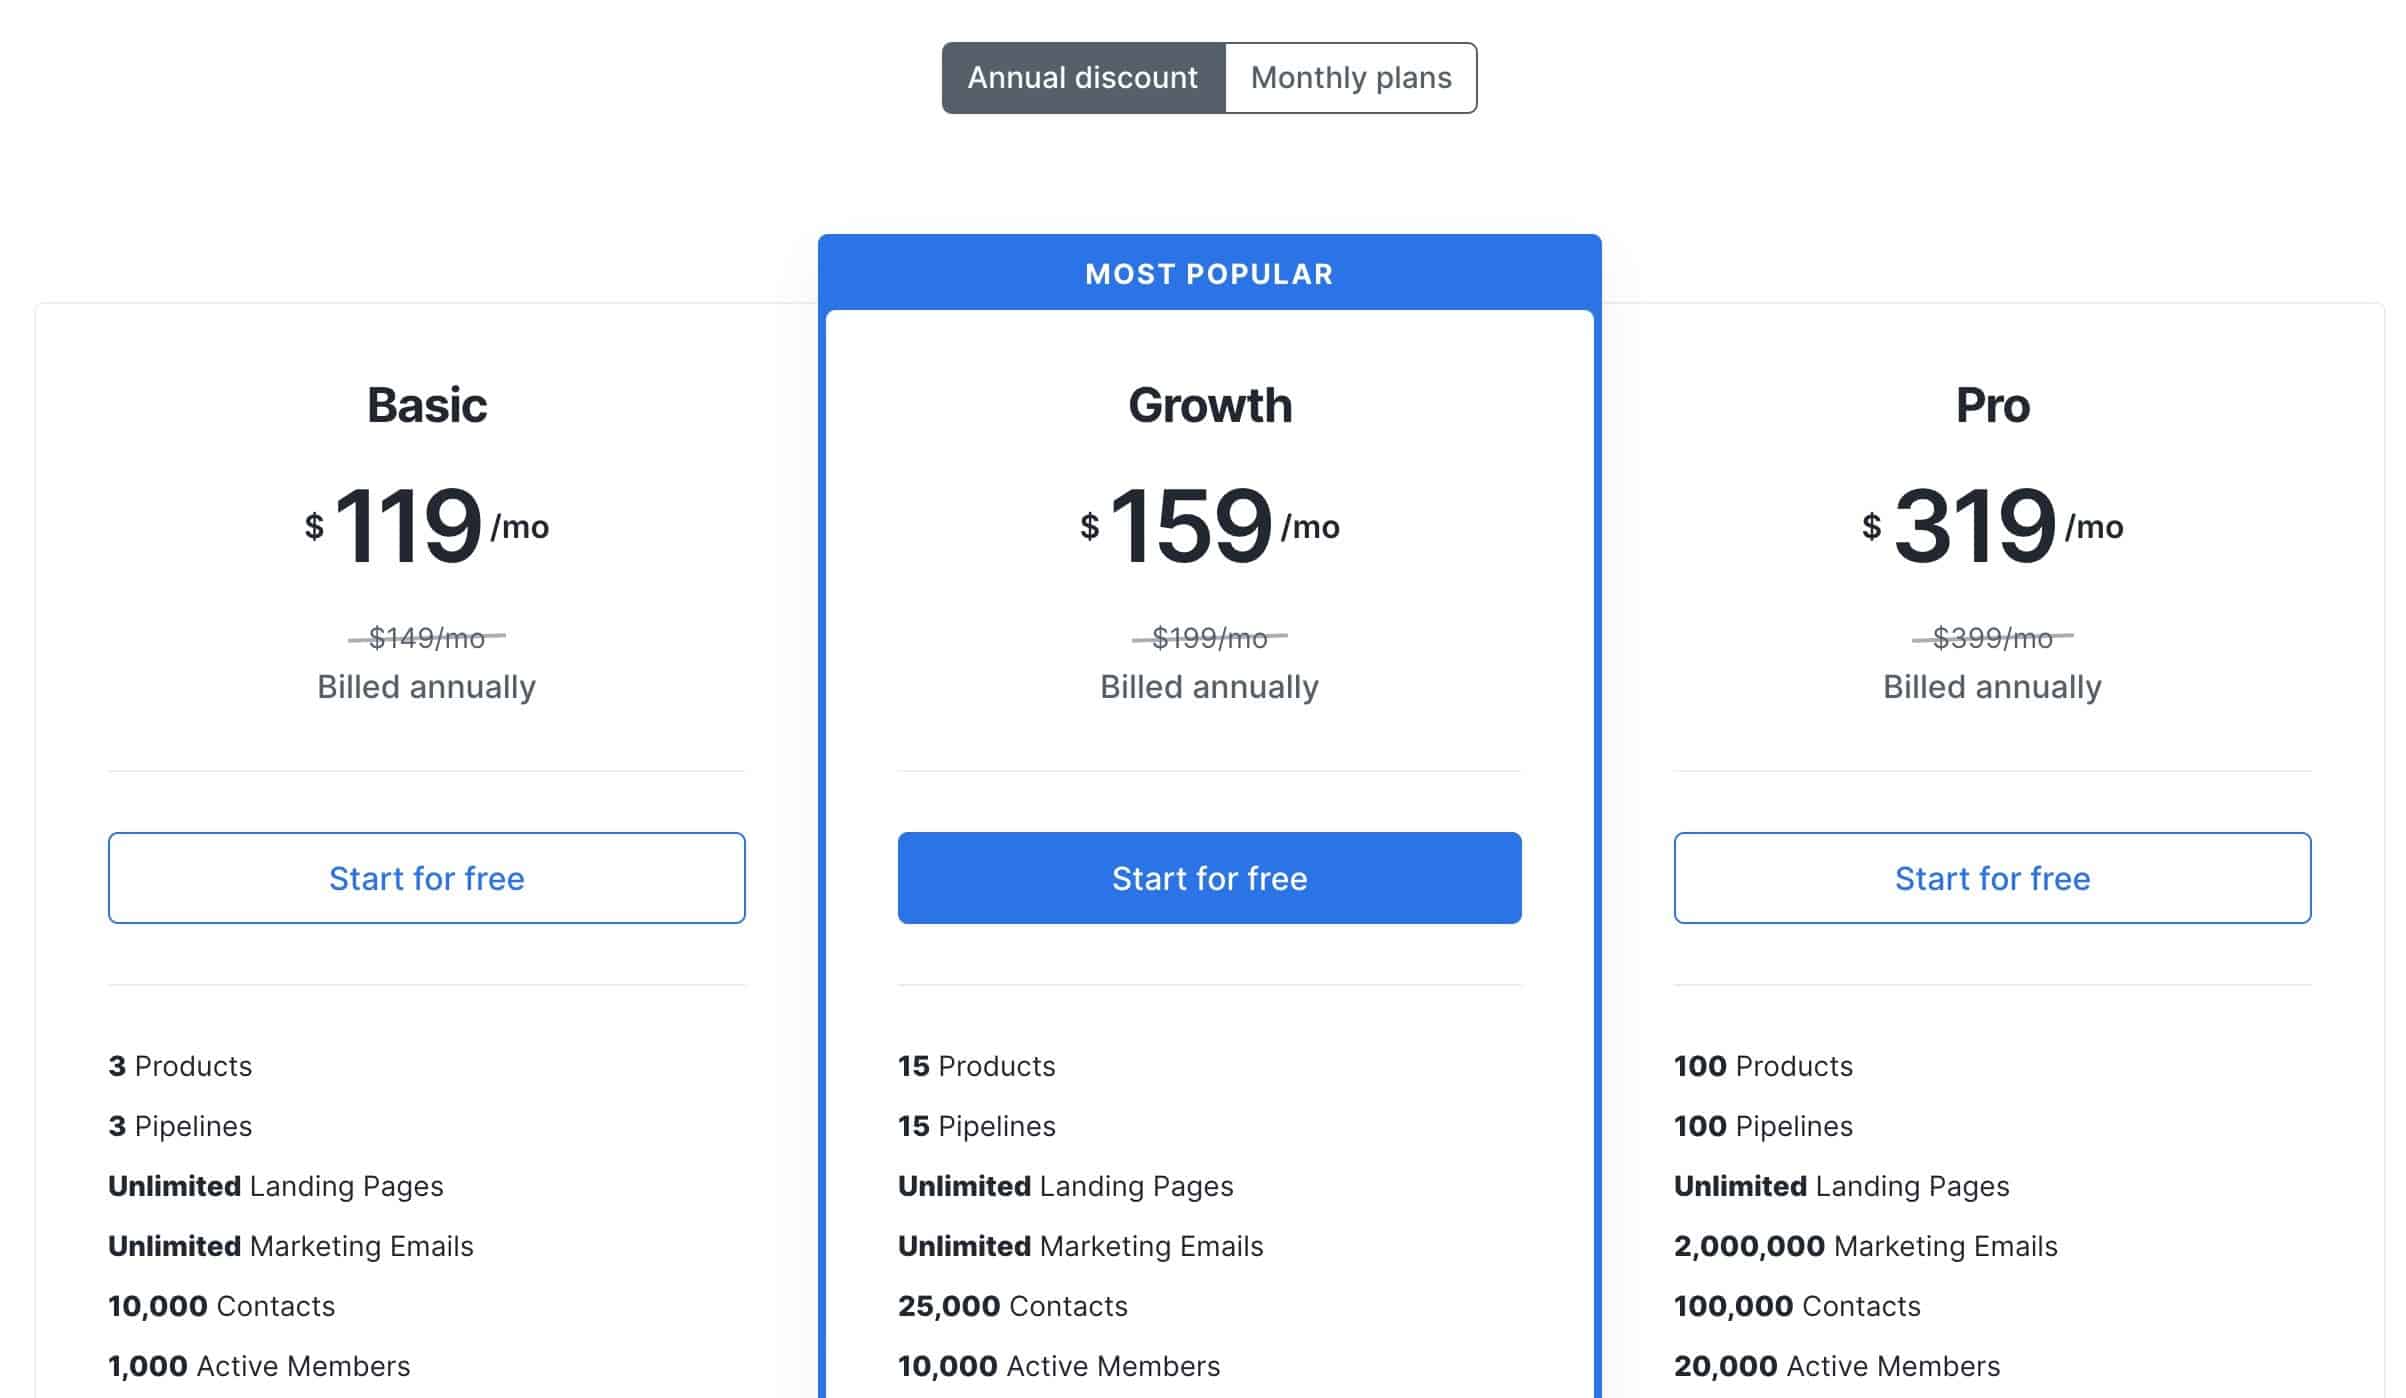
Thinkific
Thinkific is an all-in-one solution that you can conveniently build your course from scratch.
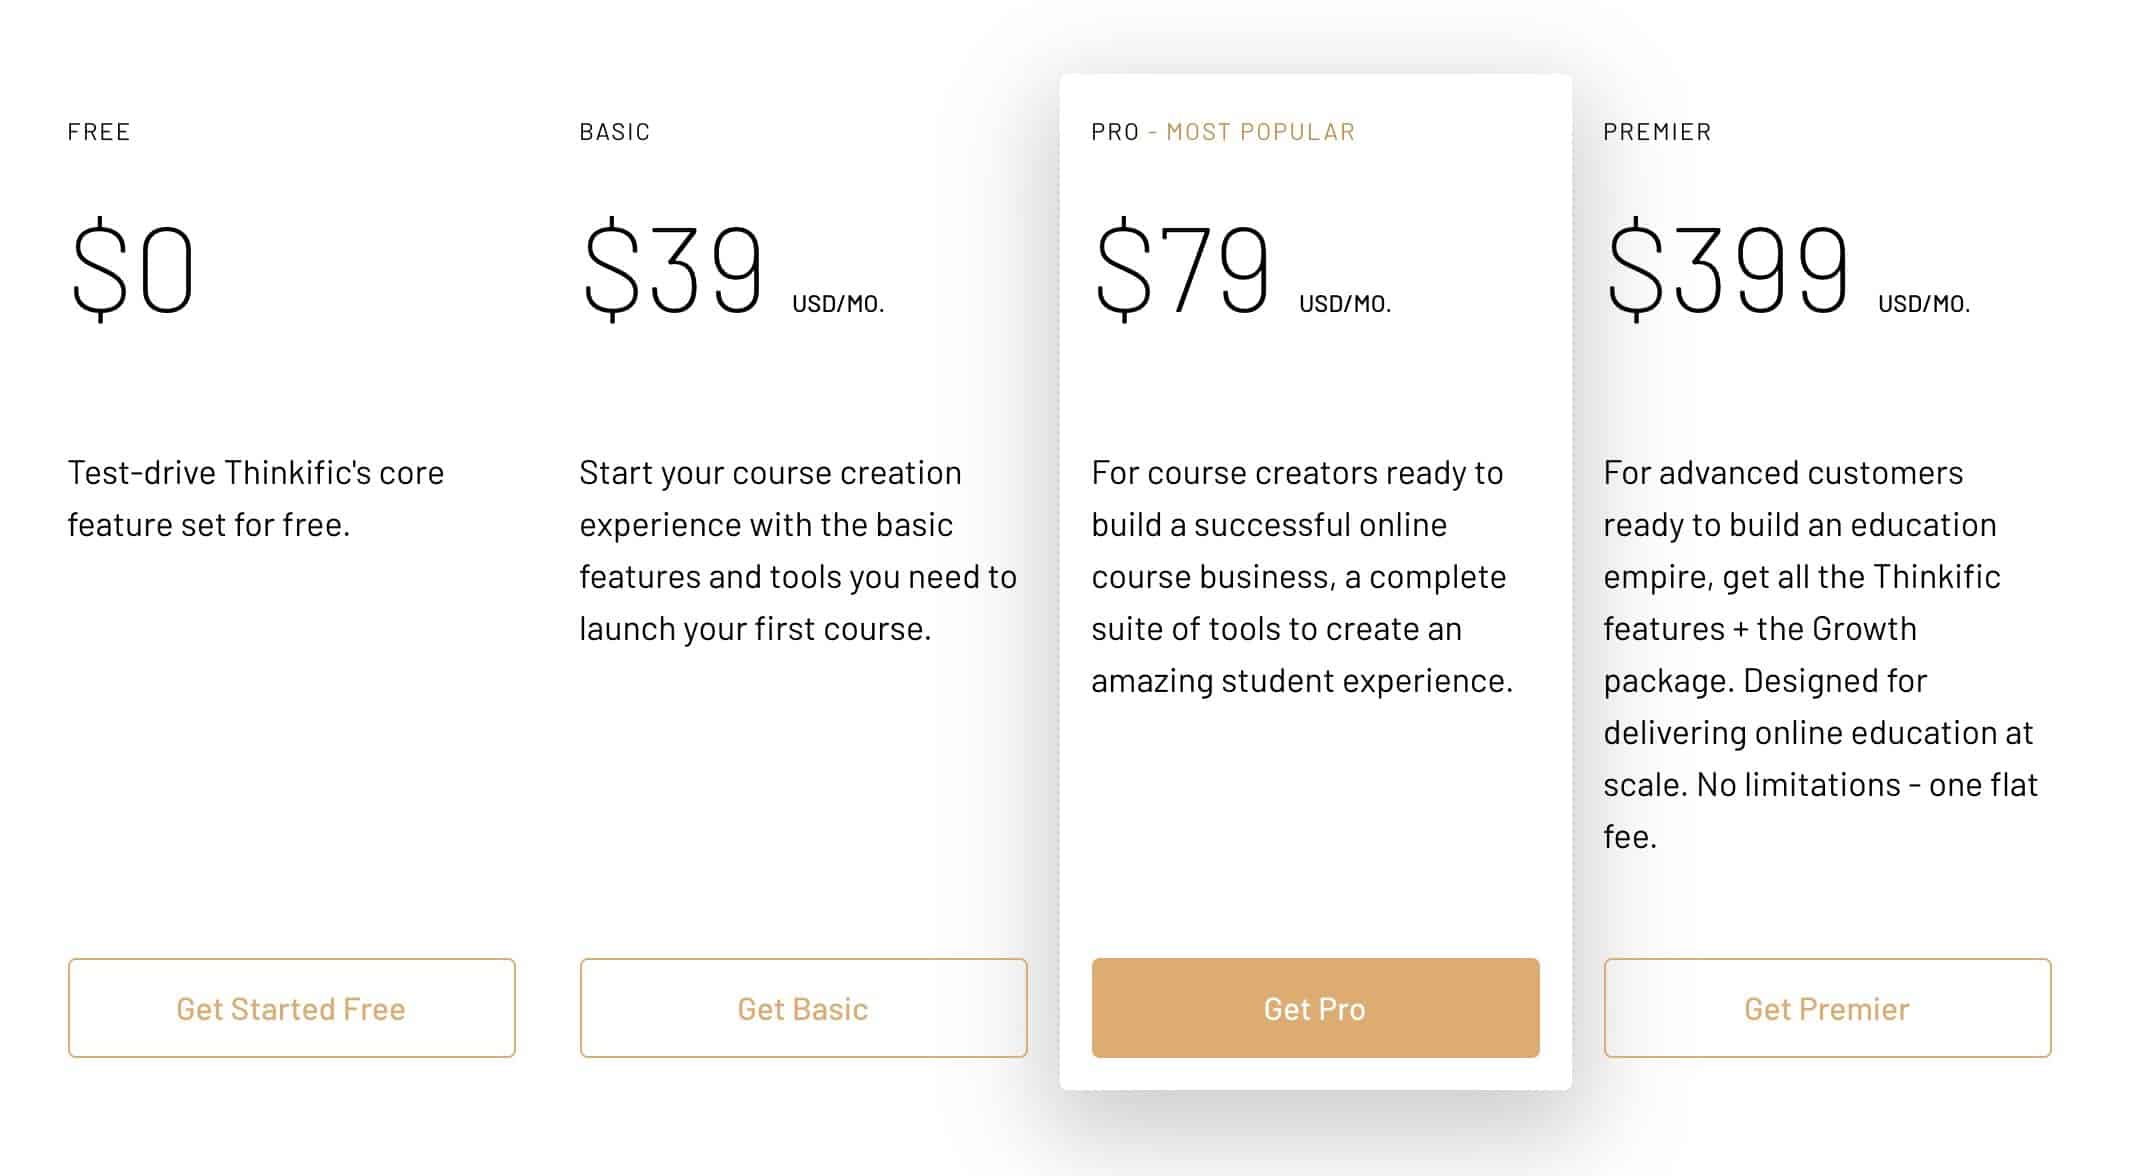
Thinkific is equipped with an easy drag-and-drop feature, payment integration, and a user-friendly dashboard where you can see your orders, student enrollment, and engagement. Thinkific is also the only solution among this list that offers a free plan.
Design
Thinkific allows you to customize your course to match the color of your brand. You can choose different layouts for your course from one of the templates.
What I like about Thinkific
What I like about Thinkific is that it is built with the international audience in mind.
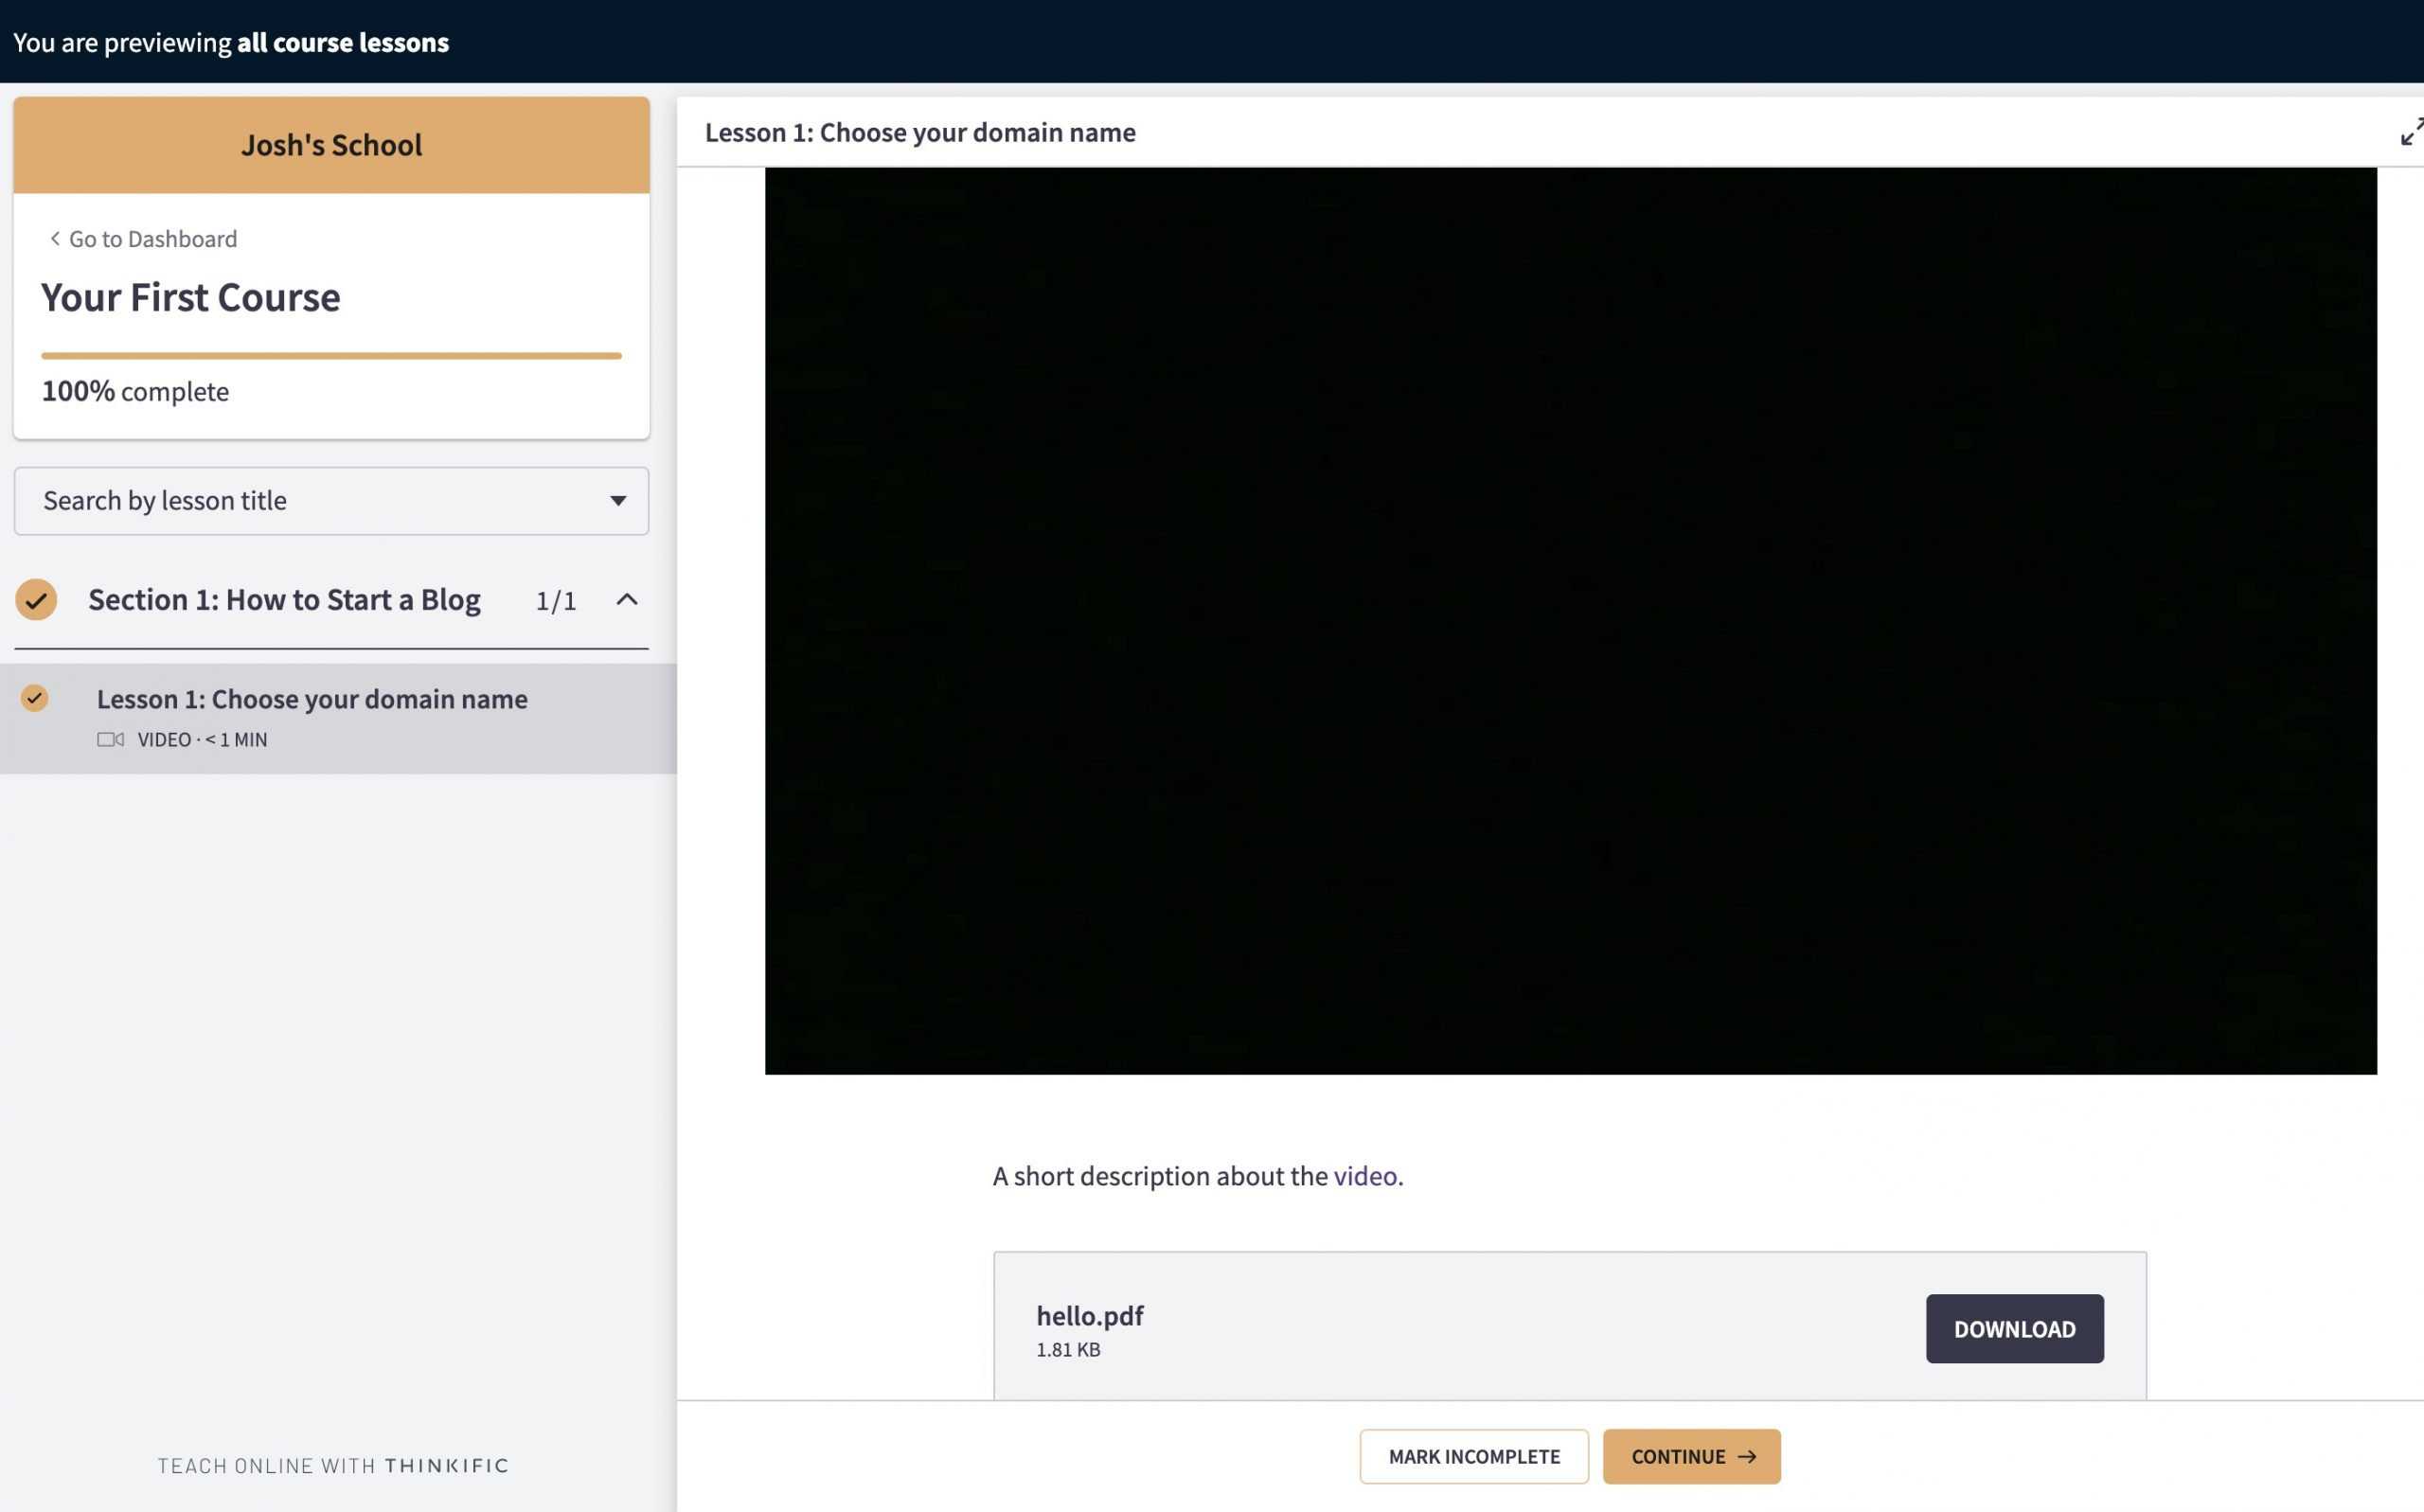
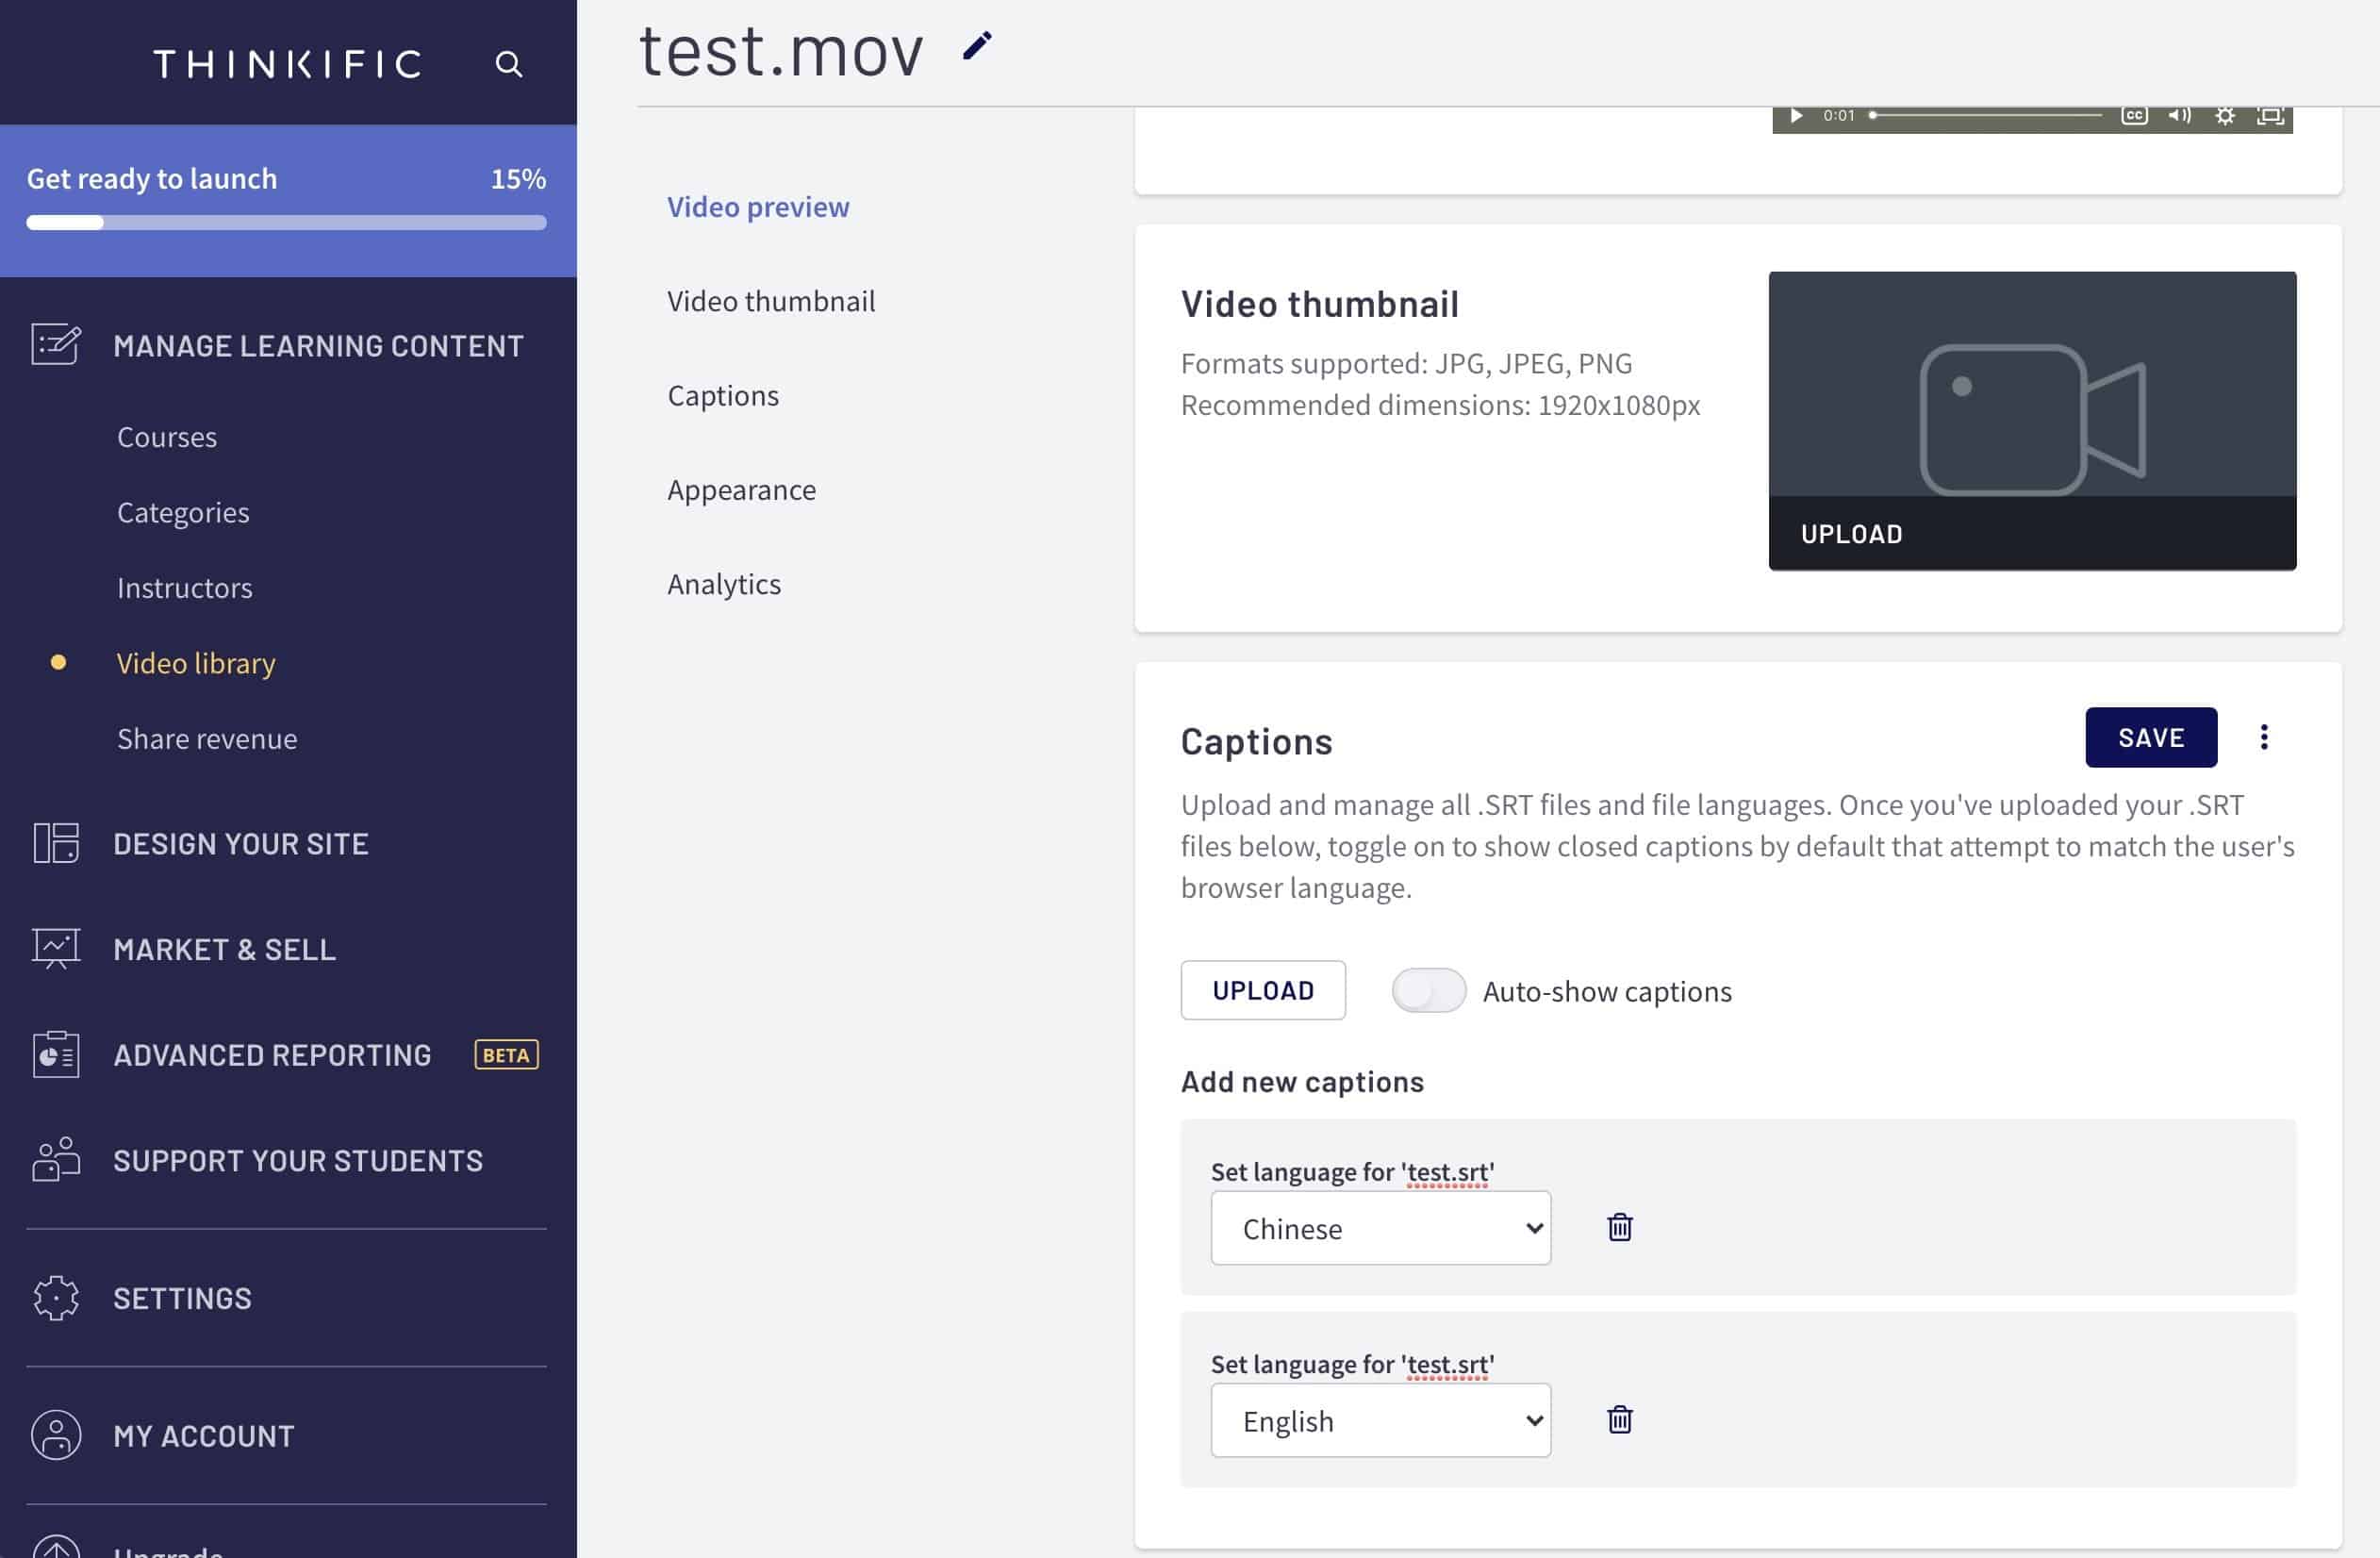
Like most online course platforms, it will host a video for you. Simply upload your video file and a custom thumbnail image to create a video lesson.
What Thinkific has that I didn’t find in other all-in-one platforms is that it lets you upload multiple SRT (subtitles) files to your videos. This is important to me since I build courses for students who don’t speak English as their native language. The ability to toggle different captions is a huge plus.
On Thinkific, the site language can be switched to 30+ languages.
All-in-one course platforms typically won’t let you change the text on predefined website elements, such as a menu, buy button, or the placeholders on input fields. But Thinkific lets you switch the site language, and those texts will also change accordingly.
Best Part
The best part? It’s free to start.
You can create up to 3 branded courses for free and then upgrade to a paid plan to create an unlimited number of courses and remove the “Thinkific” logo.
Thinkific’s paid plan starts at $39 per month. This gives course creators some leeway to test and see if their course gets traction on the free plan before upgrading to the paid plan.
Key Features
- Drag-and-drop
- Reporting on revenue, order, enrollment, and engagement
- Tracking student progress
- Issue certificates
- Student community and discussion area
- Assignments and quizzes
- Customize with HTML and CSS
- Site language available in 30+ languages
- Integration with email marketing software such as MailChimp, Constant Contact, ConvertKit, AWeber, and Active Campaign.
Courses Built on Thinkific
- Dorie Clarke: Recognized Expert course price: $1,995
- MealPrepCourse course price: $237
- Personal Development School course price: $67
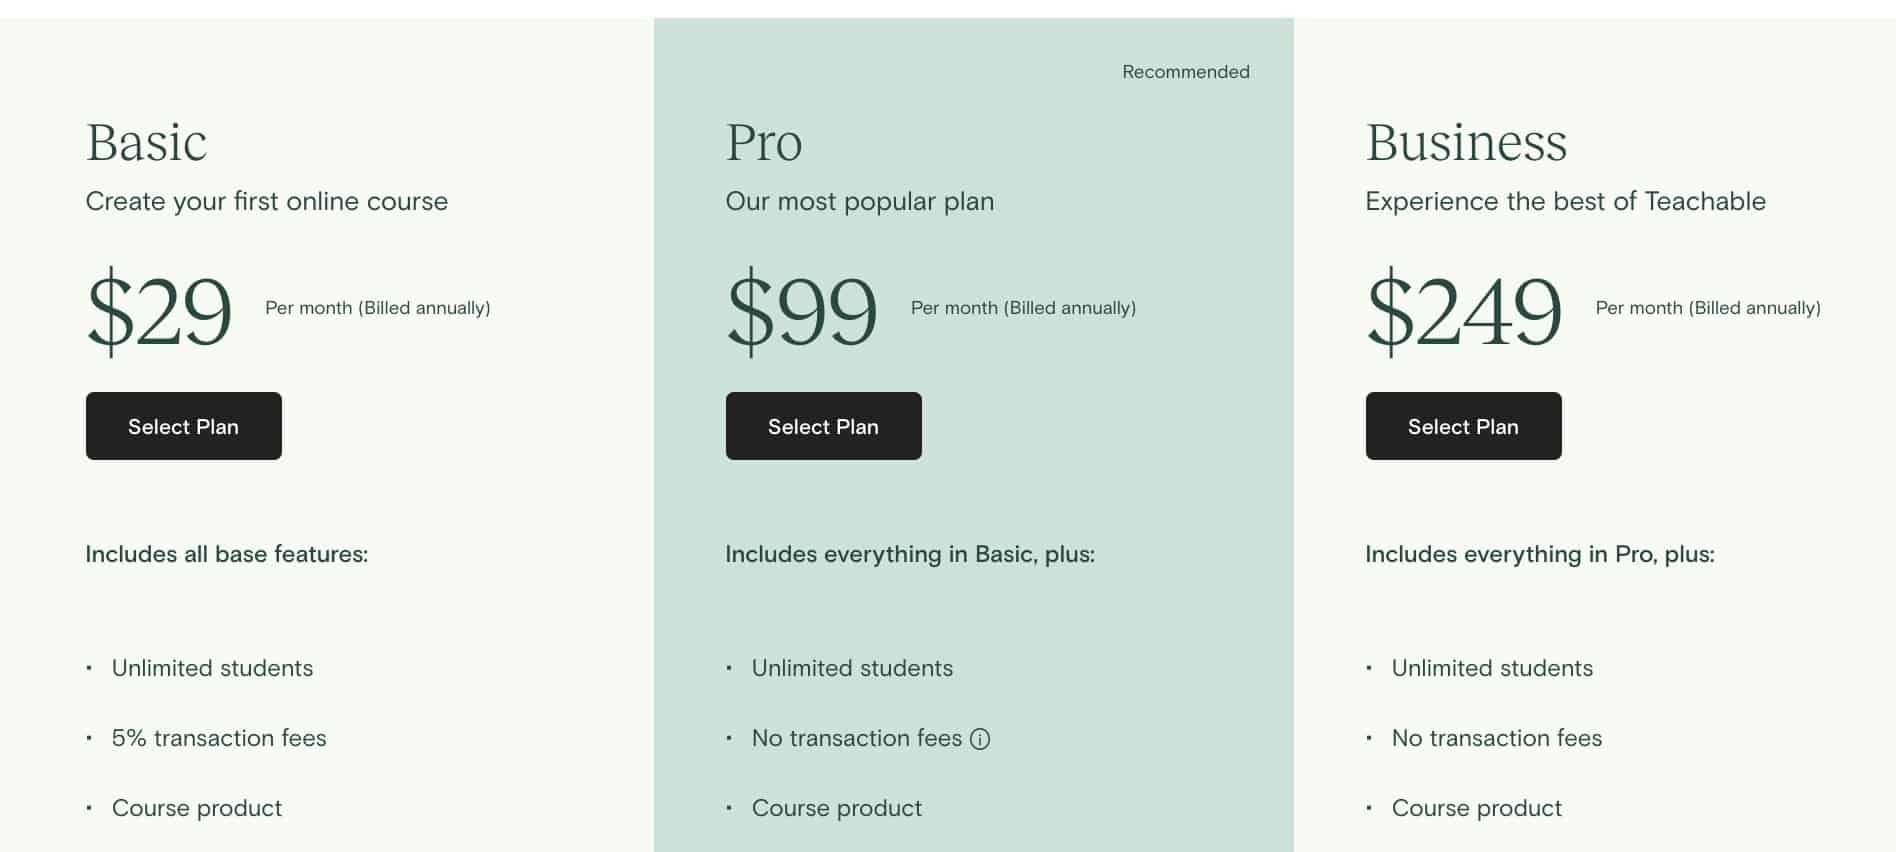
Teachable
Teachable is popular among many online course creators.
For me, Teachable is a close second since it has, in my opinion, the cleanest looking, easy-to-navigate course design. The cheapest paid plan starts at $29 a month with a 5% transaction fee for each course sold. The transaction fee is lifted for Professional or higher plans.
Design
All Teachable courses have navigation on the left pane where students can see which lesson they are on in the course.
The layout tends to be fairly uniform across all Teachable courses, but you can customize and have your look by changing the colors and background images.
What I like about Teachable
What I like about it is that it has a ton of resources and tutorials for course creators.
Not just on how to use the Teachable interface itself, but there’s a ton of articles on business and marketing skills for course creators. You can tell that they’re committed to their mission of helping course creators by the content they put out.
Best Part
Its sales page template is well-designed, and according to Teachable, high-converting. Truly no coding skills are required when building your course on Teachable.
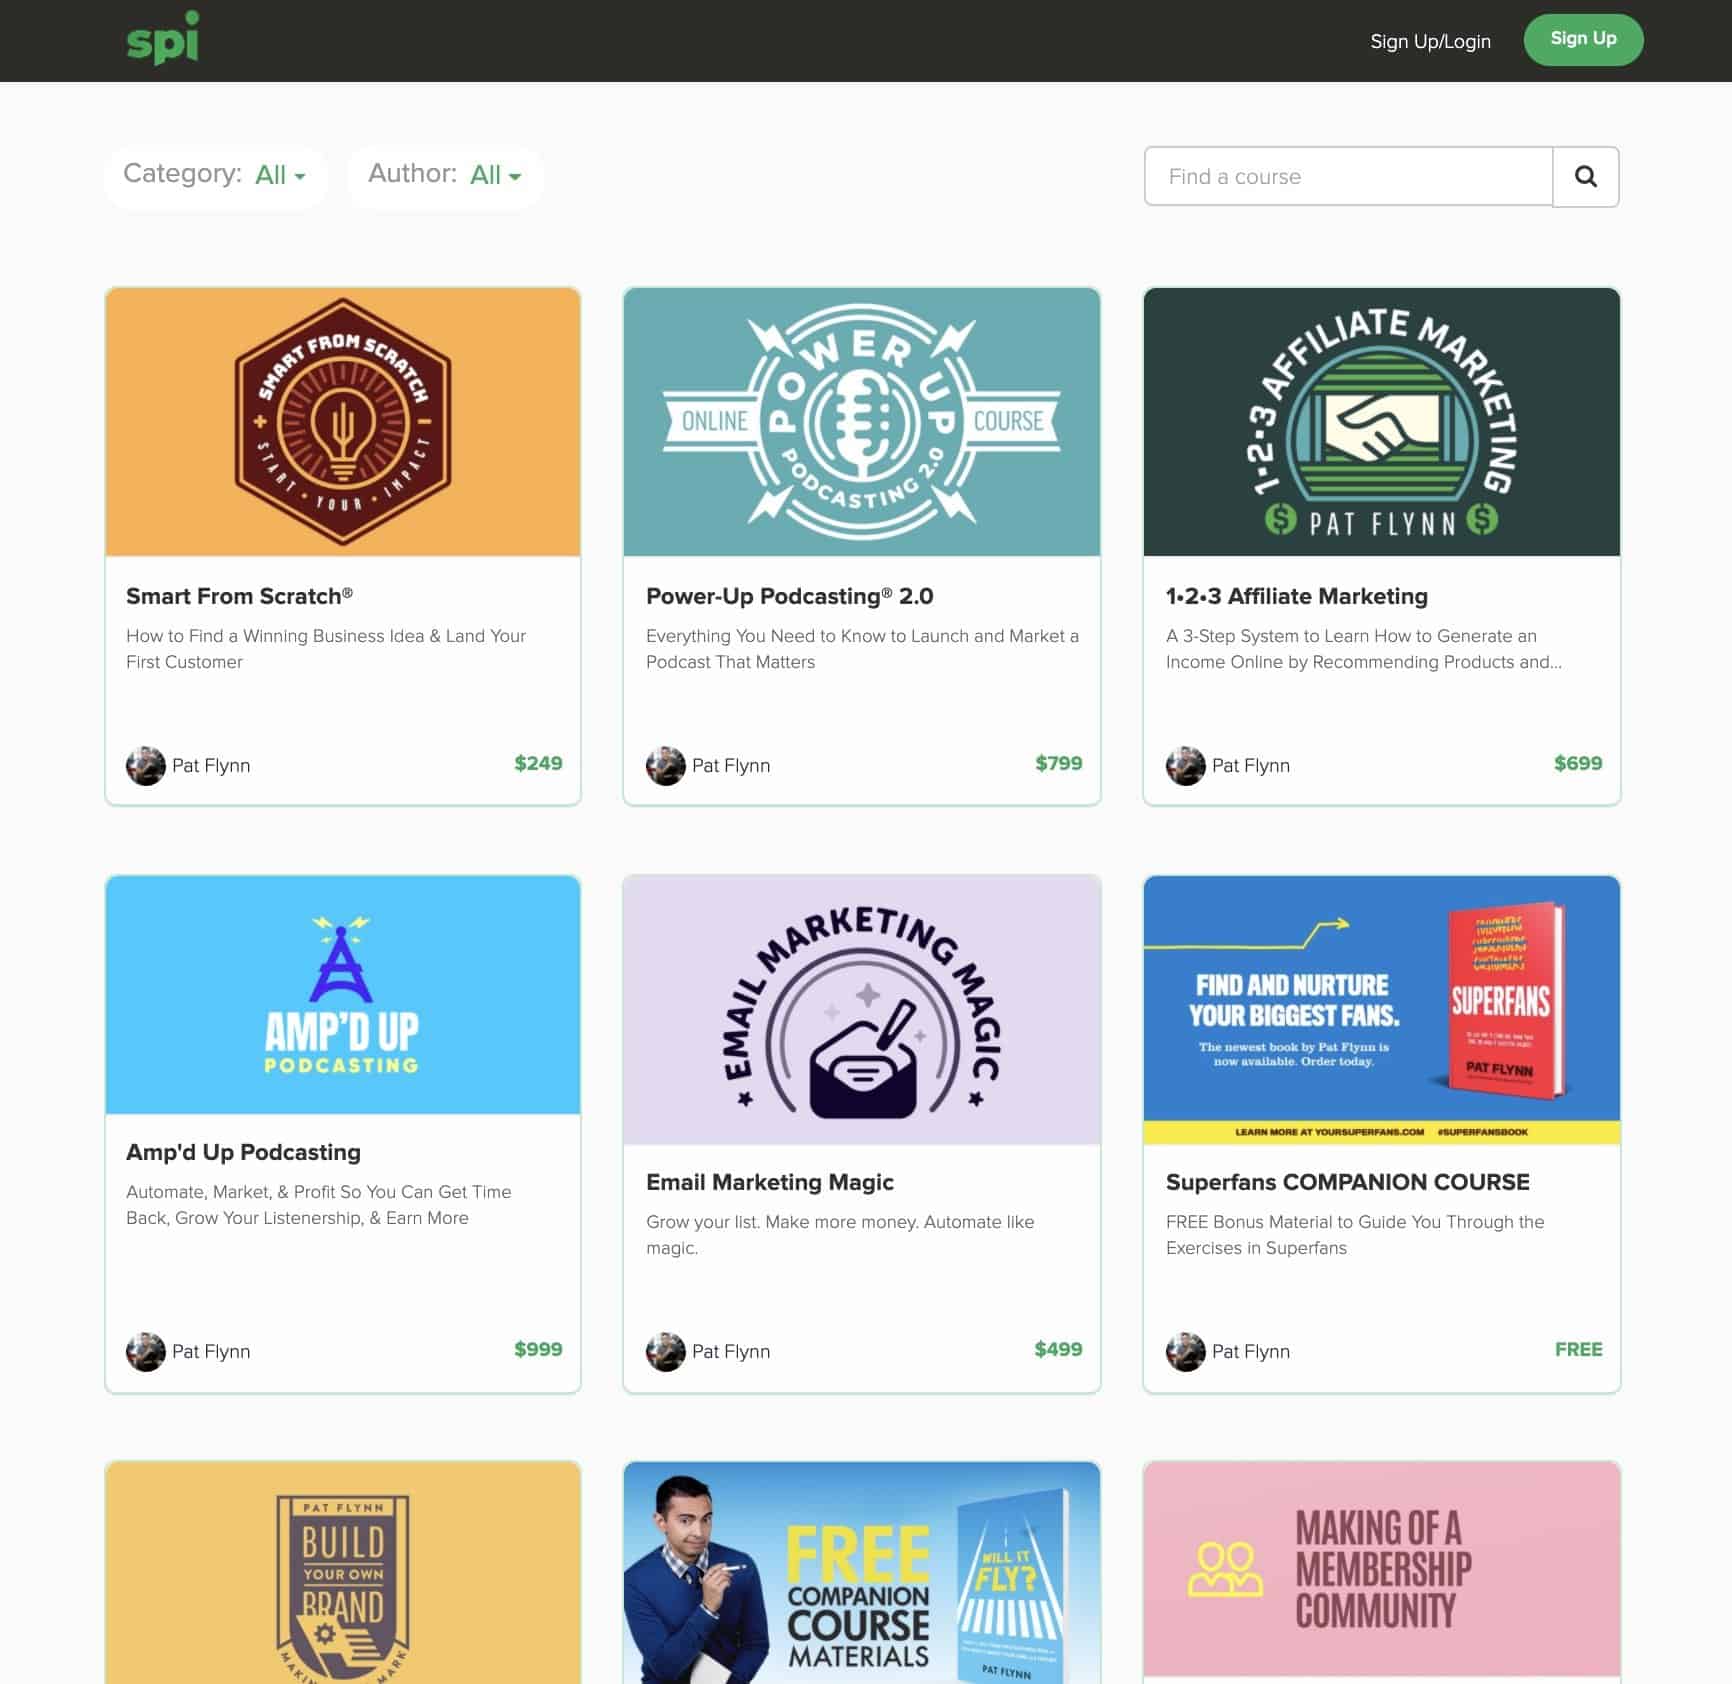
Screenshot taken from Pat Flynn’s Courses hosted on Teachable
Key Features
- Beautifully designed sales page templates
- Conversion tracking
- Data import/export
- Discount coupons
- Multi-currency
- URL customization
- Progress report and tracking
Courses Built On Teachable
Ruzuku
Ruzuku’s course design is fairly simple.
Instead of having the lesson list on the left side column, there’s a line with dots connected at the top of the page to indicate which lesson you’re on in the course. Ruzuku’s entry plan starts at $75.
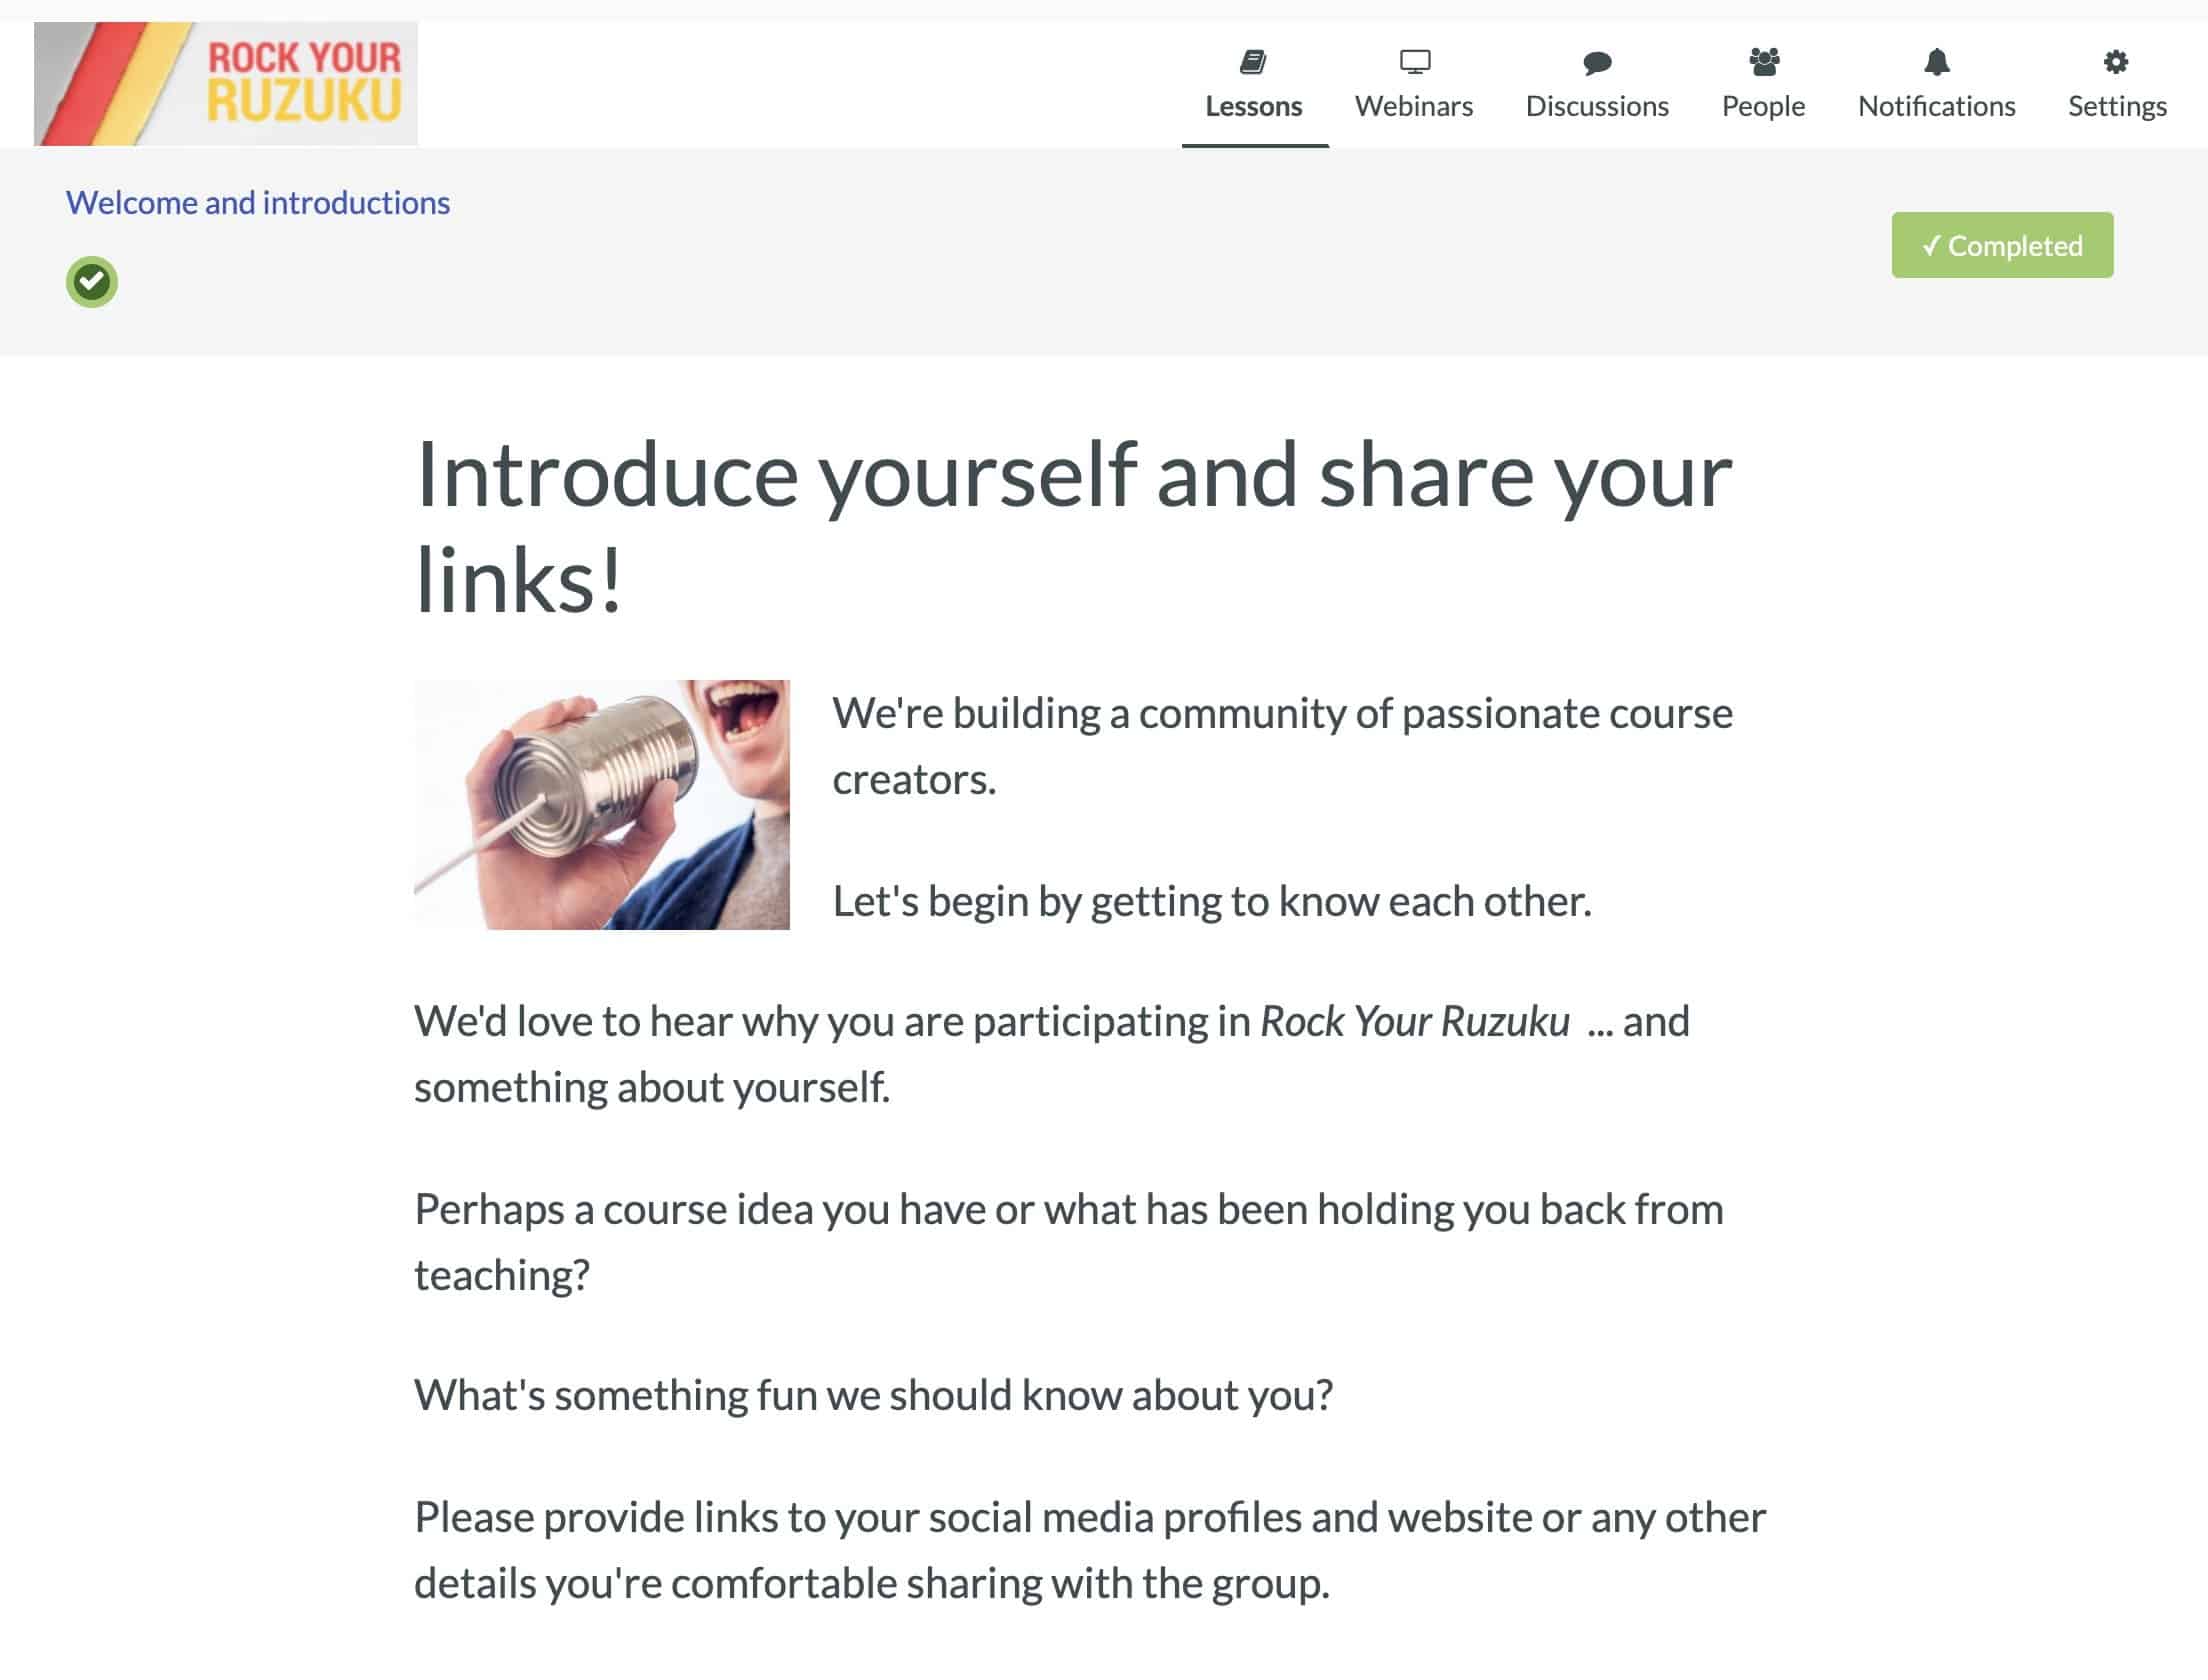
Screenshot taken from “Rock Your Ruzuku” course
What I like about Ruzuku
Ruzuku insists that you get paid directly from your students, so there’s no transaction fee across all plans (because they won’t come between you and your customers when it comes to payment).
You have to have an account created at Stripe or PayPal so that you can integrate one of those with Ruzuku to make the payment processing work and start receiving payments.
Best Part
Although there’s no free plan, it comes with a 14-day trial, which means you can take advantage of all the features and decide for yourself if it’s right for you.
Key Features
- Unlimited data hosting
- Single sign-on (students can view all courses built on Ruzuku they purchased before)
- Direct payment from your students
- Support for both the course creator and the students
Courses Built on Ruzuku
- Public speaking course $197
- Watercolor sketchbook $125
Kajabi
Kajabi is not just an online course platform, but it’s the most comprehensive, all-in-one business and marketing platform.
It has the most features out of all the platforms listed here, providing course creators with all the marketing tools they need to grow their business online.
What I like about Kajabi
It’s the most comprehensive course business tool that covers every aspect of your online business.
If you have Kajabi, you do not need a separate WordPress blog, landing page creator, sales funnel tool, video hosting, or email service, provider. Kajabi provides all that. Kajabi’s entry plan starts at $119 per month, but it’s priced at that for a good reason.
I also like the design layout of their video lesson pages (which I tried to replicate by coding on my WordPress site) and how it has well-designed templates to choose from.
Best Part
Kajabi offers a 14-day trial, but if you go through my link, they will give you a 28-day free trial.
They also have training material and a one-month challenge for new course creators, giving you enough time to test-drive and see if you can build a course and make your first sale in a month.
Key Features
- Truly an all-in-one solution which has a blog, sales page, email automation, webinars, and much more
- Quizzes and surveys
- Chat support
- Advanced automation and remove branding for higher plans
- Sell your courses through affiliates
- “Contacts” or the number of student email addresses capped at certain limits
Courses and Businesses Built on Kajabi
Udemy
Udemy is a great marketplace to test if your course idea has a demand.
If you don’t already have a high traffic website or large social media following, Udemy is a great place to promote and start selling your courses to get the ball rolling.
If I have a course idea but if I don’t have a website to attract students, I’d sell a small course on Udemy to see if there’s a demand, then eventually create a flagship course from it.
What I Like about Udemy
It just has a huge catalog of courses listed on their site. Visitors who are browsing Udemy are already primed to buy, making it a perfect place for your course to get discovered. You can also check out popular courses to see what is working for them.
How do you get paid on Udemy?
Udemy pays its instructors by revenue share. The share percentage is different depending on how a student finds and buys your course.
If a visitor is already on Udemy and buys your course, you have a smaller share. If someone goes through your promotional coupon or referral link and buys your course, you get a bigger share.
Why are some Udemy courses so cheap?
You can also subscribe to their promotional deal where Udemy will boost your courses for more visibility on their website with discounts offered on your course. Not all discounts are bad.
You have to decide for yourself if offering your courses with discounts and getting as many eyeballs as possible aligns with your business strategy.
Skillshare
Skillshare offers a monthly subscription plan where students get unlimited access to all courses.
Compared to Udemy, it doesn’t seem to have as many courses listed. But on the flip side, all the video courses seem to be produced at high quality. There’s a reason for it, which I’ll get into.
Skillshare’s audience is mainly creators. If you look at the course listing, most of the courses are in the creative fields, such as photography and writing. Courses that probably do well on Skillshare are how-to’s and step-by-step tutorials.
What I like about Skillshare
What I like about Skillshare is that it’s a beautifully designed website that’s easy to navigate. For students, a monthly subscription with unlimited access is a good deal.
How do you get paid on Skillshare?
Skillshare does not pay its instructors by revenue share. Skillshare pays its instructors by watch time and referrals. The longer students watch your videos, the more you get paid. The more students you bring into Skillshare, the most you get paid.
For that reason, the video production quality on Skillshare tends to be high — which hopefully helps with more watch time.
Who is using Skillshare?
YouTubers like Thomas Frank and Polymatter have their courses listed on Skillshare and for a good reason: They know how to make engaging high-quality videos.
I recommend Skillshare to someone who knows how to produce high-quality videos that keep the viewers hooked in order to accumulate as much watch time as possible.
DIY on WordPress
Build your course on WordPress if you love the total control over every detail and small aspects of your course.
This, by far, would be the most time-consuming way since you’ll have to build a course website itself in addition to your course lessons. You also will have to learn the ins and outs of each plugin you use, and when necessary, make customizations and code to make different plugins integrate.

I would recommend this way only if you simply enjoy web development, or if you already have an existing WordPress website or blog for your business and you want your course website to have a seamless brand experience.
This section deserves its page. I describe how I built my online course on WordPress from scratch in another post.
For now, here are the recommended WordPress plugins to use to create and organize your lessons.
LearnDash
Learndash is extremely feature-rich for a WordPress plugin.
You can assign quizzes, grade assignments, award points for completing the course, and set a logical sequence so the students will complete a prerequisite lesson or course before advancing to the next.
You can award badges and certificates, as well as make the lessons available according to a schedule.
![]()
Compatible Themes
LearnDash is compatible with popular themes like Divi and WP Astra.
It looks good out of the box without having to code CSS. BuddyBoss has a LearnDash-specific theme that has a social-media like an appearance.
My Thought on LearnDash
This plugin has so much to offer it’s really good for someone wanting to create something similar to the structure of all-in-one platforms like Thinkific and Teachable on WordPress.
Because there are so many settings to tweak, it may take some time for you to get to know the plugin well.
Overall I like the plugin except there’s one sticking point for me.
What I didn’t like about LearnDash is its lesson navigation. “Topics” are organized by “Lesson” sections, which are then organized into a “Course.” When you finish all the topics within the first lesson and click “next,” you’re taken back to the first lesson page, instead of redirecting to the first topic of the second lesson.
For some courses, it might make sense for students to go back and review what topics they have covered once they’re done with the first lesson.
But for me, I’d rather have students sail through and keep moving onto the next topic with fewer clicks in between.
Technically I could change the way lessons progress by customizing PHP, but if you’re not careful, changing PHP in a premium plugin would cause conflict when there’s an update later on.
Choose LearnDash if the course navigation does not bother you the same way it did for me.
Pricing
The cheapest plan starts with a 1-site license at $199 with 1-year support and updates.
WP Courseware
WP Courseware is an easy-to-use plugin that allows you to organize your lessons by drag-and-drop.
Its key features include drip content, notifications to your students, instructor roles on WordPress, quizzes and surveys, certificates, and many more. Because it only has the bare-bone basics, it’s very easy to use.
![]()
Compatible Themes
WP Courseware is compatible with popular themes such as Genesis Framework and Beaver Builder page builder.
My Thought on WP Courseware
If you just want a quick start with the absolute basics, go with WPCourseWare. You still need a membership plugin to protect your content behind a paywall.
But at the same time, you might want to complement other plugins for the features that WPCourseWare is missing
Pricing
You can try WP Courseware for 30 days. The cheapest plan starts with a 2-site license at $124.50 with 1-year support and updates.
LifterLMS
The LifterLMS core plugin allows you to create unlimited courses, lessons, administrators, instructors, and even instructor assistants, memberships, students, individual student dashboards, and quizzes.
Because the membership feature is built-in, you can protect your course content and schedule drip content as well. Each student who logs into your WordPress site has his or her dashboard and account page.
![]()
LifterLMS core plugin is free to use but costs more if you would like to take advantage of their add-on features. Add-ons include integration with popular email service providers, form plugins, payment gateways, and “LifterLMS Powerpack.”
Pricing
The base pricing starts at $99 per each add-on for a year with a 30-day trial. If you plan to use more than 3 add-ons, then it would be more cost-saving to purchase their bundle plan which starts at $299 per year for all the add-ons.
If it were up to me, the three types of add-ons – payment gateway, forms, and email service provider – are necessary to me so I’d just go with the bundle plan.
If you just look at the base price, LifterLMS is the most affordable WordPress plugin for online courses and you could be quite content with the core plugin itself.
MemberMouse
MemberMouse is one very comprehensive, behemoth of course plugins out there.
In addition to the basic features that come with most LMS plugins, MemberMouse comes with a dashboard showing student progress, churn and retention, payment order, and refund rate.
It even goes as far as to let you customize the login page, password reset page, limit login updates, prevent account sharing (students can only be logged in to one browser or computer at a time), employee accounts, international currency, and much more.
![]()
It’s an enterprise-level plugin so, with MemberMouse, you don’t need any other learning associate plugins to complement it.
The flip side of a comprehensive system is that you’ll have a steep learning curve to fully utilize all the features MemberMouse offers. It’s similar to the all-in-one online course platforms mentioned above, except built on WordPress.
Compatible Themes
This goes without saying for all LMS plugins but especially with MemberMouse, I recommend you choose your theme and hosting carefully.
Having a dashboard of all the data and metrics inside WordPress is very useful, but you want to make sure your website already runs fast on a cleanly coded theme on a sturdy host so that MemberMouse runs smoothly.
EspressoEnglish, a website for teaching English as a second language, uses MemberMouse to manage its courses.
Pricing
You can get started on MemberMouse at $33.17 per month with a 14-day trial.
FAQ
How do I create online courses?
Anyone can create an online course, but not everyone can be a master at course creation and making millions from it. I cannot say it does not happen, but you should not expect a huge success from your first online course.
What I recommend is to create a small version of your course priced modestly and go through the entire motion of creating and selling your courses first. After you get a hang of it, then create a premium version of your course at a much higher price point.
Regardless of what kind of course you create, the process of course creation follows these steps.
- Pick a target audience and identify their needs
- Establish a learning objective and expected outcome
- Create a lesson outline
- Create your lessons (text, audio, video)
- Reinforce learning through quizzes, worksheets, or action steps
- Check-in to encourage student progress
- Provide a sense of closure
1. Pick your target audience and identify their needs
If you want to make sure your course succeeds, then you have to find out where your students are.
You might have a topic in mind that you want to teach, but when you get to know your audience and their needs, you might find out that you have to start from a lot more basic level.
For example, if you want to create a course on photography and your idea was to teach different techniques to take beautiful scenic photos.
But in your research, you might find out that your students want to learn about the types of lenses before getting into the techniques.
2. Establish a learning objective and expected outcome
Based on what you learned about your audience’s needs, decide on the expected outcome.
What does success look like for students who take your course? Paint the clear picture so your students know what they’re working towards.
In a photography course, it might be taking their very first beautiful scenic photo. In a coding class, it might be creating a basic Pinterest-like website. For a productivity course, it might be waking up at the same time every day and feeling energized.
3. Create a lesson outline
Create a step-by-step roadmap that helps students achieve the goal.
Each lesson should be sequenced in a way that helps students move closer to their goal, and help your students with the tools and techniques required to overcome the obstacles that may come.
Ideally, an expectation should be established for each lesson. In a photography course, taking this first lesson might help students choose the best camera lens for their situation.
Or taking this another lesson might help students deepen their understanding of hue and white balance, which they can review by taking quizzes or worksheets. Each lesson should have an outcome and a way for students to review what they just learned.
4. Create your lessons
A typical online course is presented with video lessons, accompanied by PDF worksheets or audio files.
Whether you go with the video format or combinations of those different formats, lessons should be designed to clarify a point, show how things are done, or answer a student question.
If you’re not comfortable showing your face on camera, you could create presentation-style videos with a voiceover. You could also look into using animation or footages. An explanation of different types of video lessons can be found on a separate post.
5. Reinforce learning
Give your students specific action steps in most if not all your lessons so that they can reinforce what they learned through doing.
This could be accomplished in the form of quizzes, worksheets, homework, accountability check-ins, or any other ways that make sense for your course.
In a virtual learning environment, or even in a real-world environment, you can’t make anyone do anything. But it is your job as an instructor to make it as easy as possible for your student to feel encouraged so that they can do their homework on their own, or apply what they learned in the course through your directives.
Some students only need a self-paced online course to succeed. Some students might need a lot more hand-holding. That is where you could offer one-on-one coaching or community access and discussion as an upgraded plan to your course in order to ensure your student success.
6. Check in to encourage student progress
If you’re providing a self-paced course, then the time it takes for each student to complete the course will vary.
If you can provide a way to check in with their students and motivate them along the way, it’ll hugely help students who might be stuck.
You could provide this kind of support by creating an automated email sequence to remind and encourage students after they enrolled in your course. Or, you could make your content “drip” over time so they’re only accessible at a certain time after the enrollment, or make certain lessons a prerequisite before advancing to next.
You could also offer virtual “office hours” where students can ask you questions. You want to know where and why your students are stuck so that you can use that insight to make the next version of your course better.
7. Provide a sense of closure
You want to give a sense of closure when the student completes the entire course. This could be as simple as having a closing video at the end of the course.
Or, you could issue a certificate of completion. And importantly, you want to remind them what they have learned in the course, and how they have gained all the knowledge and tools to achieve their goal.
How long should my course be?
Longer is not always better. A course shows a shortcut or roadmap for your students to get from point A to point B for your students.
Your job as an instructor and course creator to curate information and present what the student needs in each step of their learning journey.
Don’t give them more than they can chew at a time. But do give your students a feeling of exclusivity and a sense of direction, because after all, this is a paid course which should be giving them experience different from just scouring for free information online.
Is my course good enough?
This is an understandable fear and something many first-time course creators may experience. You might be knowledgeable in a specific field, but being able to teach what you know in a way that novices can learn is a separate skill you have to hone.
That is why I recommend that you start small with your first online course so that you can learn from doing it. At the end of the day, it’s not up to you to decide if the course is good enough or not.
It’s up to your students to decide. Your videos might not have the best lighting or audio quality, but if the content is good your students might find it very valuable.
That is not to say your video quality can suffer — try to make it as good as you can within your means — but do monitor your student reaction because your idea of good isn’t the same as your students.
What if I’m not confident?
There’s always someone smarter and better than you in the world. If a smart person looks at your course, do you know what he or she would think?
Nothing. They don’t care. Because they’re not your target audience!
A smart person is not going to dwell on your course in the first place. They’d be busy doing their own things!
So don’t worry if you feel like you don’t know enough. If you’re teaching a subject and if your skill level is at 5 on the scale from 0 to 10, your course can help people at level 0 and bring them up to level 4. You don’t need a Ph.D. in English to teach high school students how to write a good essay. It’s nice to have, but not a requirement.
Once again, understand your target audience. Be credible in their eyes. Guide them so that they can go up to the next level. It doesn’t matter how smart you are as long as you can help your students.
When we don’t have confidence in our courses, we’re often comparing ourselves to fictional people who have nothing to do with our business. So focus on your student’s needs and build your course around that.
Conclusion
I hope this guide will help you build your online course. The best online course platform is different depending on your needs and requirements as an instructor.
Having said that, my top recommendation is to start with Thinkific. It’s my online course platform of choice.
Which online course platform should I add to this list? Is there any part in the guide where you were not clear and would like to know more? Let me know in the comment.
Join the Newsletter FREE
Get Exclusive Productivity Tips That I Only Share with Subscribers
![]()
Hi, I'm Sushi. I started this blog to share productivity tips and tools to stay organized as a remote worker.